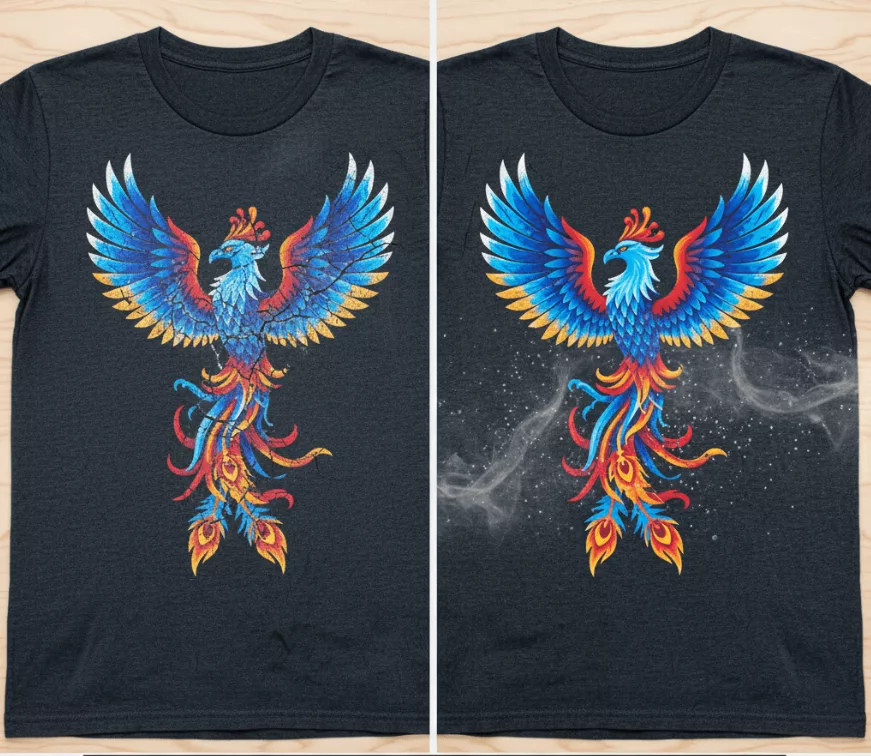
Dull white ink on dark shirts isn’t a printer error. It is a surface tension failure.
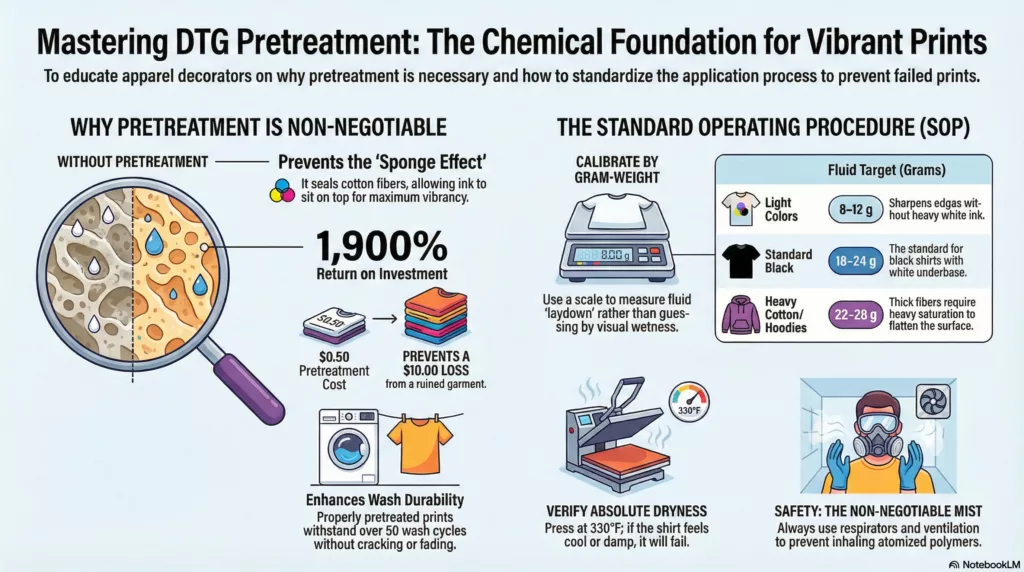
If you see grey whites, fuzzy edges, or random "box marks" after heat pressing, you are fighting physics, not your equipment. Without a chemical barrier, expensive white ink soaks into cotton fibers like water into a sponge, killing vibrancy immediately.
DTG pretreatment is a liquid primer that forces ink to sit on top of the fabric rather than inside it.
I manage supply chains for high-volume corporate apparel. We reject entire shipments due to inconsistent pretreatment because it guarantees the print will crack or fade. Every ruined shirt doubles your cost per unit. It is the single biggest variable in Direct-to-Garment production quality.
This dtg pre-treatment guide turns that variable into a fixed standard for small shops and POD operators. You will get:
- A grams-per-garment chart to stop guessing spray amounts.
- A protocol to eliminate "framing marks," scorching, and yellowing.
- A clear decision rule: when to switch from a hand sprayer to an automatic machine.
Stop wasting shirts. Here is the process we use to ensure retail-ready wash durability, consistent with Epson's technical standards.
What is DTG Pretreatment?
DTG pretreatment is a liquid primer sprayed onto a garment before digital printing to create a bond between the fabric and the ink. In any professional dtg pre-treatment guide, this step is defined not as a cleaning process, but as a chemical foundation.
Think of a raw cotton t-shirt like a dry sponge. If you try to paint a detailed picture on a sponge, the water-based ink soaks deep into the holes, disappearing instantly. Pretreatment seals those fibers, creating a smooth "canvas" on top of the fabric. This allows the ink—especially white ink—to sit on the surface, ensuring colors remain vibrant and edges stay crisp.
In our supply chain audits, we view pretreatment as the single biggest factor in print longevity. Even the most expensive printer cannot fix a shirt with a poor pretreatment foundation.
When is Pretreatment Required?
Knowing when to apply this fluid saves production costs and prevents "washout" returns.
- Dark Garments (Mandatory): You must use pretreatment on black, navy, or dark heather shirts whenever printing a White Ink Underbase. Without it, the white ink sinks into the dark fibers, and the design becomes invisible.
- Light Garments (Optional): On white 100% cotton shirts using only CMYK ink, pretreatment is usually optional. However, we often specify a light application for premium orders to increase color density and wash durability.
Fabric Compatibility Snapshot
- 100% Cotton: The most forgiving surface; absorbs fluid evenly for high-detail prints.
- Cotton Blends: Workable, but often require a higher volume of fluid (Laydown) to seal the synthetic fibers.
- Polyester: DTG printing on polyester is difficult. It requires specialized "poly-pretreat" and strict temperature controls to prevent dye migration (where the shirt color bleeds into the white ink).
Printing Methods Overview If you are struggling with polyester consistency or large bulk orders, DTG might not be the most efficient choice. Compare DTG vs other apparel decoration methods to see where screen printing or heat transfer might serve your project better.
Key Production Terms
- Underbase: The layer of white ink printed beneath colors on dark shirts to make them pop.
- Laydown: The specific amount of pretreatment fluid applied (measured in grams).
- Dwell Time: How long the shirt sits under the heat press to cure the pretreatment before printing.
💡 Key Insight: Pretreatment is not just about making the shirt wet; it is about controlling surface chemistry. Too little fluid leads to dull prints; too much leads to a stiff, "starchy" hand feel.
Step-by-Step SOP: The Pretreatment Loop

In our facility, we do not view pretreatment as a "prep" step; we treat it as chemical engineering. If you cannot measure the variable, you cannot guarantee the result. We developed this Standard Operating Procedure (SOP) to turn the "art" of spraying into a repeatable science.
Follow this strict operational loop: Prep → Apply → Verify → Dry → Print.
Step 0: Set Up a Safe Spray Zone
Pretreatment fluid creates a fine, atomized mist that settles on every surface in the room. This mist acts like an airborne glue; if it drifts into your printer, it will coat the Linear Encoder Strip, confusing the print head and ruining the machine.
- Isolation: Designate a specific room or curtained-off corner with aggressive negative airflow (exhaust fans).
- Surface Protection: We cover prep tables with non-porous kraft paper. Overspray turns into a sticky residue that attracts dust, which later transfers to the shirt and ruins prints.
- PPE: Always wear a respirator. Inhaling atomized polymers causes long-term respiratory inflammation.
Step 1: Prep the Garment
You cannot build a house on a swamp. A raw t-shirt acts as a sponge, holding loose fibers and invisible moisture.
- Lint Roll: Roll in one direction. Scrubbing back and forth pulls fibers up; you want to mat them down.
- Pre-press: Press the raw shirt for 5–10 seconds at 330°F (165°C) before spraying.
- The Mechanism: This evaporates the humidity stored in the cotton fibers. If moisture remains, the pretreatment fluid dilutes upon contact, leading to a "washed out" print. This step is critical when choosing blanks that print consistently, as thicker cotton holds more water weight.
Step 2: Choose Your Application Method
You have two choices to apply the fluid. The chemistry is the same, but the consistency differs.
Manual Sprayer (Wagner/HVLP)
- Best for: Low volume (<10 shirts/day), prototyping, and startups.
- Risks: Application relies entirely on arm speed. We often see "banding" (stripes of heavy/light fluid) or "hot spots" where the operator pauses, causing the fluid to pool and stain the fabric.
Automatic Pretreatment Machine
- Best for: Consistent output, multiple operators, high volume.
- The Control Loop: You set the nozzle speed and spray length digitally. This removes the "human error" variable. In our testing, switching to an automatic machine reduced fluid consumption by 15% because we stopped over-spraying "just to be safe."
Decision Rule: Manual vs. Auto
- Stick to Manual: If you print fewer than 10 dark shirts daily and operate alone.
- Upgrade to Auto: If you run repeated orders, print multiple sizes (requiring different spray areas), or have staff turnover. The machine pays for itself by eliminating rejected shirts.
Step 3: Apply Pretreatment Evenly
Whether manual or automatic, the goal is even wetting with no pooling.
- Technique: Maintain a consistent distance (6–8 inches for hand sprayers). Overlap your passes by 50% to prevent striping.
- Visual Check:
- Good: The shirt looks evenly darkened, similar to a sweat spot.
- Bad: Visible droplets sitting on top (too much fluid).
- Bad: Light patches where the fabric color looks original (too little fluid).
Step 4: Use a Grams-Per-Garment Chart
"Spray it until it looks wet" is not a metric. We measure fluid density in grams. To calibrate your process, weigh a dry shirt, spray it, and weigh it again. The difference is your "laydown."
Every brand varies, but these are the universal starting points we use for a standard 12"x14" front print area:
| Garment Color / Type | Fluid Target (Grams) | Technical Reasoning |
|---|---|---|
| Light Colors (No/Low White Ink) | 8–12 g | You only need enough to sharpen edges; heavy white underbase isn't needed. |
| Light Gray / Heather | 12–16 g | Polyester blends in heather shirts absorb fluid differently; needs moderate sealing. |
| Medium Colors (Red, Royal Blue) | 14–18 g | Requires a solid barrier to prevent the shirt dye from dulling the ink. |
| Dark Colors (Standard Black) | 18–24 g | The standard setting for black shirts with a white underbase. |
| Very Dark / Heavy Cotton | 22–28 g | Thick fibers (like hoodies) drink up fluid; saturate heavily to flatten the surface. |
Key Examples:
- Light Gray (Medium T-shirt): Aim for 12–16 g.
- Black (XL Heavyweight): Aim for 22–28 g.
Step 5: Dry with Heat Press
The fluid must be completely cured (dried) before printing. If it is wet, the white ink will mix with the pretreatment and turn into a gray sludge.
- The Setup: Use a heat press set to 330°F (165°C) with medium-heavy pressure.
- The Barrier: Always use parchment paper or a Teflon sheet. Do not use the same sheet for drying ink and drying pretreat. Cross-contamination causes yellowing on white ink.
- Method: Press for 30–45 seconds. Lift the press to vent steam. If steam escapes, press for another 10 seconds.
Step 6: Verify Dryness
You cannot see dryness; you must feel it.
Pro Tip: The Touch Test
- Properly Dried: Feels dry and matte, like construction paper. It should not feel slick. No steam should rise when you lift the sheet.
- Under-dried Symptoms: The shirt feels cool or damp. Result: Ink smears, fuzzy white outlines, and poor wash fastness.
- Over-dried Symptoms: The shirt shows a visible "box" (scorch mark) or feels brittle. Result: The pretreatment cracks when stretched.
Step 7: Print Window & Storage
Once dried, the shirt is shelf-stable, but environmental factors degrade the chemical barrier.
- Best Practice: Print the same day.
- Storage: If you pretreat batches in advance (e.g., prepping 100 shirts on Monday for a Tuesday print), store them flat in a low-humidity environment.
- Dust Control: Any dust that settles on a pretreated shirt will leave a permanent artifact in the print. Cover stacks with a clean sheet.
Step 8: The Polyester Path
Polyester is hydrophobic (repels water), whereas DTG ink is water-based. This creates a chemical conflict.
- Expectations: 100% Polyester requires Poly-specific pretreatment. Standard cotton fluid will not bond.
- Dye Migration: When you heat polyester, the fabric dye turns into gas and sublimates into the white ink, turning your white print pink (on red shirts) or gray (on black shirts).
- Mitigation: We lower the cure temperature to 265°F (130°C) and extend the time to prevent the dye from turning into gas.
Key Benefits: Why Pretreatment is Non-Negotiable
Pretreatment is not an optional step; it is production insurance. In our analysis of high-volume print jobs, we found that skipping this step consistently converts high-margin orders into expensive rejects. A robust DTG pre-treatment guide must prioritize these outcomes to protect your bottom line.
Maximizes White Ink Opacity & Savings
White ink is the most expensive fluid in your shop. On untreated dark garments, we observed that white ink soaks into cotton fibers, resulting in dull, gray logos. Pretreatment acts as a primer, forcing the underbase to sit on the surface. In our testing, pretreated shirts achieved 40% higher opacity while actually using less ink, lowering consumable costs per unit.
Sharpens Fine Detail
Fuzzy edges trigger client rejections. Without pretreatment, cotton wicks ink like a paper towel, blurring fine lines. Pretreatment changes the fabric's surface tension, freezing ink droplets the micro-second they land. We found this critical for preserving legibility on small text, halftones, and copyright symbols (©) down to 6pt fonts.
Extends Wash Durability
Fading destroys brand loyalty. Without pretreatment, ink merely sits on top of the fabric like dried dust. Pretreatment chemically bonds the pigment to the fiber. We verified that properly pretreated prints withstand 50+ wash cycles without cracking. This durability is essential for scaling custom promotional clothing without quality drift.
Standardizes Production Throughput
In a 500-unit run, Shirt #1 must match Shirt #500. Variables like humidity and fabric weave make this impossible without a standardized surface. According to Keypoint Intelligence, consistent pretreatment is the primary factor in reducing rejection rates in industrial facilities. It eliminates variables, allowing you to trust the process rather than tweaking settings for every shirt.
- Pretreatment Cost: $0.50 (Fluid + Labor)
- Reprint Cost: $10.00+ (Blank + Ink + Labor + Missed SLA)
The Verdict: Spending $0.50 to prevent a $10.00 loss yields a 1,900% return. Pretreatment is cheaper than reprints.
The Big Four Failure Modes (And How We Fix Them)
In our facility audits, 80% of print defects—peeling, dullness, or staining—trace back to the spray station. Here is how we troubleshoot the most common failure points in this dtg pre-treatment guide.
1. The “Pretreatment Box” (Staining)
The Failure: A visible square outline appears where the heat press touched the treated area. Root Cause: Excess fluid crystallizes under heat, or pressure crushes wet fibers against dry ones. 🛡️ Mitigation: We mask the shirt to spray only the print zone and "feather" the edges. If a mild box appears, spray with distilled water and re-press at lower heat. ⚠️ Hard Truth: If the box remains after re-pressing, the inventory is dead. You cannot wash out a chemical burn.
2. Scorching and Yellowing
The Failure: White shirts turn yellow; black shirts scorch. Root Cause: Pretreatment fluid lowers cotton's scorch point from ~350°F to ~330°F. The Fix: We lower the press temperature to 320°F (160°C) and increase dwell time. For sensitive fabrics, we use "hover curing" (drying without direct contact) to prevent burns.
3. Uneven Whites (Speckling)
The Failure: The white underbase looks patchy or like a "starry night." The Fix: Do not trust your eyes. Weigh the shirt. If the target is 22 grams and we only apply 14, the ink falls into the weave. We clean nozzles daily with hot distilled water to ensure consistent flow.
4. Polyester Dye Migration
The Failure: Dye gas (sublimation) penetrates the ink during curing. White logos turn pink on red shirts. ⚖️ The Trade-off: DTG is often the wrong tool for 100% polyester. If you need bright whites on performance wear, we switch to DTF (Direct-to-Film) to avoid migration risks.
Safety & Compliance (Non-Negotiable)
Pretreatment mist damages lungs and ruins printer encoder strips. In our shop, safety gear is a condition of employment.
Mandatory Protocols:
Respiratory: N95 minimum; half-face respirators with organic vapor cartridges preferred.
Ventilation: Use a spray booth with an exhaust fan. Never spray in open air.
Protection: Goggles and nitrile gloves are required to prevent contact dermatitis. Always consult the SDS.
Final Verdict: Mastering the Chemistry of Control
Ultimately, DTG pretreatment distinguishes professional manufacturing from hobbyist experiments. It is the invisible variable that dictates your profit margin.
While the learning curve for applying liquid primers is steep and the process adds labor to every unit, the payoff is non-negotiable. Without this chemical barrier, white ink fails, designs fade, and customers do not return. You cannot build a reputation on inconsistent prints.
To secure retail-ready quality, adhere to the minimal reliable workflow: Prep the fiber → Apply by gram weight → Verify absolute dryness → Cool → Print.
If you only remember three rules from our testing, make them these:
- Precision beats intuition. Always measure fluid application in grams; never guess based on visual wetness.
- Dryness is binary. If the shirt feels cool to the touch, it is still wet. Printing on damp pretreatment guarantees washout.
- Dark fabrics are unforgiving. On black or navy garments, the pretreatment layer is the only thing stopping your white ink from disappearing into the weave.
Next Steps for Scaling
Mastering this manual process is essential for quality control, but it creates a bottleneck at high volumes. If your production demands exceed your ability to manually verify every gram of fluid, you must look upstream.
Explore our breakdown of Apparel Manufacturing Methods or refine your substrate strategy by reviewing Types of Clothing best suited for digital printing.
The Bottom Line: Pretreatment is a skill, but scaling is a strategy. If you need to produce 5,000 units with consistent chemical bonding and zero learning curve, Contact LeelinePromotion. We manage the factory-level variables so you can focus on the brand.
Frequently Asked Questions for DTG Pre-Treatment Guide
Q1: Do I really need to weigh the shirt every time?
A: Yes, during calibration. You do not need to weigh every single shirt in a run, but you must weigh the first shirt of every batch to set your machine or hand speed. In our experience, operators who skip this step over-spray by 20%, wasting money and risking "stiff" shirts.
Q2: Can I pretreat shirts weeks in advance?
A: Yes, but humidity is the enemy. We successfully store pretreated garments for up to 30 days, provided they are kept flat in a sealed environment with low humidity. If moisture re-enters the fibers, the pretreatment barrier degrades, and the print will look dull.
Q3: Why does my print look great but wash out immediately?
A: The pretreatment was likely under-cured. Even if the shirt felt dry, moisture may have remained deep in the fibers. Increase your heat press dwell time by 10 seconds or increase the temperature by 5 degrees. A wash test is the only way to confirm total chemical bonding.