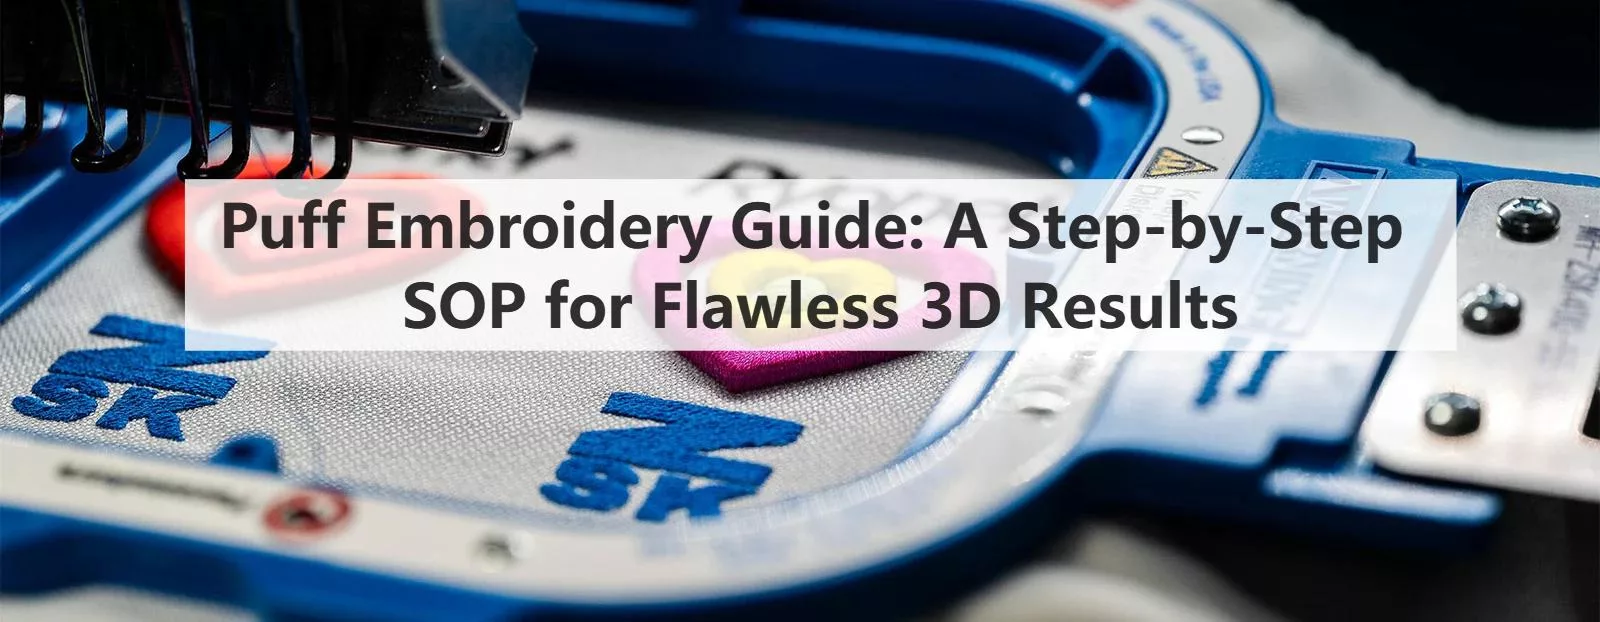
Puff embroidery is notoriously unforgiving. A single digitizing error, typically insufficient density, leads to "foam poke-through" that ruins expensive blanks instantly.
This puff embroidery guide serves as a repeatable SOP for shop owners and advanced operators for apparel manufacturing methods. Instead of relying on luck, we define the exact digitizing specs required for clean, raised 3D effects on.
We cover the three pillars of success:
- Design: Selecting fonts compatible with standard high-density foam.
- Digitizing: Capping satin ends to fully enclose the material.
- Execution: Calibrating machine speed and tension.
I have included macro photography to clearly distinguish between jagged failures and crisp, commercial-grade edges. Expect 1–3 test stitch-outs; this dense stitching generates significant needle heat, so proceed with caution.
Tools & Prerequisites for Puff Embroidery Guide

Consumables & Hardware Checklist
- Puff Foam: High-density embroidery-grade sheets (e.g., roughly 35–40 shore hardness). Do not use craft foam; it disintegrates during stitching.
- Needles: Size 75/11 or 80/12 KK-style. The specialized shank and enlarged eye reduce friction. See guidance from Groz-Beckert.
- Thread: 40wt high-tenacity polyester. Rayon often snaps under the high tension required to slice foam.
- Stabilizer:
- Garments: 2.5–3.0 oz cutaway (1–2 layers).
- Caps: Heavyweight non-woven cap backing.
- Adhesion: Double-sided tape or temporary adhesive spray (use in a ventilated area).
- Finishing: Precision tweezers, curved scissors, and a heat gun to shrink excess fibers.
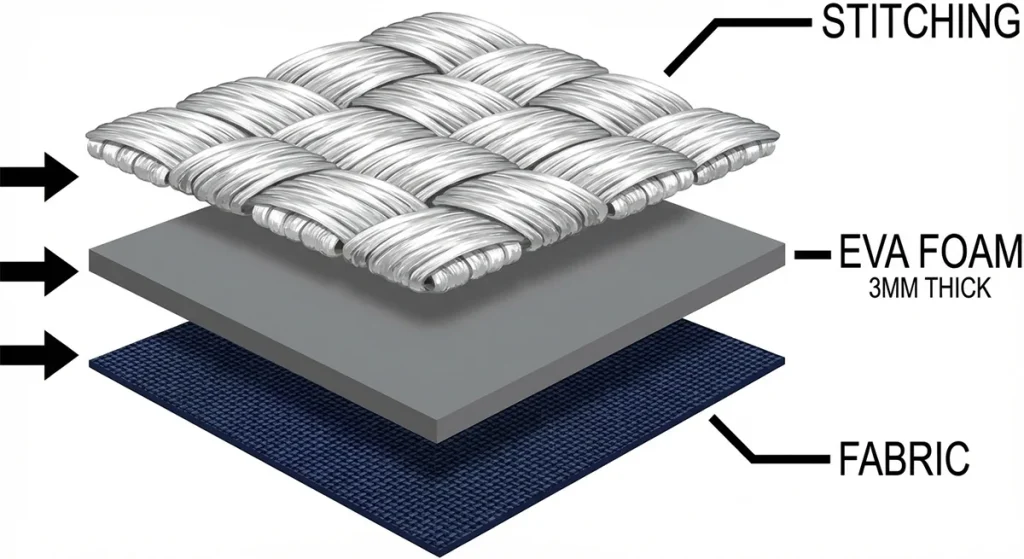
Foam Thickness Standards
- Hoodies/Knits: 2mm–3mm. Thicker foam creates rigid patches that distort soft fabric drape.
- Caps: 3mm. The industry standard for a classic raised 3D effect.
- Heavy Canvas/Denim: 3–4mm. Only suitable for rigid outerwear.
Technical Specifications & Compliance
- Digitizing Software: Must allow manual density control and "end cap" creation. Standard auto-digitizing tools cannot generate the specific satin columns needed to cut foam.
- Machine Config: Program a Color Stop/Pause command before the puff layer. Consult your Machine Manual for maximum speed settings on 3D layers.
- Sourcing: If scaling production via Custom clothing manufacturers Australia, request SDS/MSDS documentation to ensure foam is free from prohibited toxic blowing agents.
⚠️ Safety First: Keep hands clear during foam placement. Dense satin stitching generates significant friction heat; never pause the needle inside the design to avoid scorching polyester fabrics.
1. Optimize Artwork for Puff Geometry
Puff embroidery follows strict physics: bold, wide satin columns are mandatory. Thin details fail to perforate the foam or get swallowed entirely.
- Eliminate hairline strokes, micro-serifs, and tiny counters (interior holes in letters like 'e').
- Prioritize Block or Varsity lettering styles to ensure clean angles.
- Account for placement: keep critical details away from the extreme curve edges of the cap.
Select a build method:
- Custom Digitizing: Manually adjust densities for logos in your embroidery software.
- Rapid Prototyping: Use BX/typable fonts (compatible with platforms like the official Embrilliance platform) which include pre-calculated foam cutting lines.
Verification: Print or preview the design at 100% scale. Place a scrap of foam (usually 3mm) against the printed lines. If any stroke is narrower than the foam thickness, it will not puff. Under magnification, strokes must look "chunky" and consistent without tapering to a single thread width.
Accessibility Note: Describe shape requirements explicitly (e.g., "Widen the vertical pillar") rather than relying on color references like "the green section."
Step 2: Select Foam Density and Thickness
Use high-density embroidery foam (35–40 shore hardness) designed to withstand friction heat and tear cleanly. ⚠️ Warning: Avoid generic craft store EVA foam. It crumbles under high-speed needles and leaves permanent debris ("pokies").
Select thickness by application:
- 2mm: Subtle lift for lighter garments or small text.
- 3mm: The industry standard for caps.
- 4mm: Bold effects; requires wide columns.
- 5–6mm: High Risk. Attempt only after mastering standard depths.
Sensory Check: Squeeze the foam. It must feel springy and resilient. If it feels brittle or tears in your hand, discard it.
Match Colors: Select foam that matches your thread color. This hides visibility if gaps occur at sharp corners.
Verification: The Stack Test Place your foam, fabric, and stabilizer under the presser foot. Lower the needle manually to ensure the foot clears the stack without dragging or compressing the foam prematurely.
Step 3: Digitize the Puff Layer (Density & Capping)
The puff layer performs the mechanical work of cutting the foam. You must configure this layer to perforate edges without compressing the foam's height.
- Duplicate your base satin object to create a dedicated puff layer.
- Navigate to Object Properties > Underlay. Disable Zigzag or Tatami settings.
- Enable Edge Run only. Standard underlay stitches pre-compress the foam, destroying the 3D loft.
- Set Stitch Spacing to 0.18mm–0.20mm (approx. double standard density). This tightness creates a "perforation line" to slice the foam cleanly. Consult the official Wilcom documentation if your software uses lines/cm units.
- Digitize End Caps on all open column ends (e.g., tips of 'T' or 'L'). Create a small satin bar perpendicular to the column. Sequence this to stitch before the main column to seal the foam inside.
- Insert a Stop or Color Change command immediately before the puff layer begins to pause the machine for foam placement.
- Run the Stitch Simulator. Verify the sequence: Base Run → Stop → End Caps → High-Density Top Layer.
Step 4: Configure Machine Settings & Hardware
Before introducing foam, mechanically prepare the machine to handle added thickness and friction.
- Install a fresh needle. Swap your current needle for a KK 75/11 or 80/12 titanium-coated needle. The short shank reduces deflection during penetration. Consult the Organ Needles technical guide for specific coating specifications. Replace the needle immediately if you detect burrs.
- Adjust presser foot clearance. Set the Presser Foot Height to hover 1.5mm–2mm above the uncompressed foam. Ensure the foot stabilizes the material without causing frame strikes.
- Set speed strategy. Limit maximum speed to 400–600 SPM (Stitches Per Minute) for puff segments. Excess speed generates friction heat that melts foam and gums the needle eye.
- Calibrate tension. Maintain standard "flat" tension settings initially. Do not loosen the Top Tension knob; the thread requires force to slice into the foam.
- Verify coverage. Run a short "edge test" on scrap backing. You should see a satin column that hugs the foam tightly with no gaps.
🚀 Actionable Insight: Zone your speeds. Program the machine to stitch the flat outline at 800 SPM, then automatically decelerate to 450 SPM specifically for the foam layer. This maximizes efficiency without risking needle breakage.
Step 5: Hoop the Substrate and Validate Stability
Stability prevents fabric shifting; if the material moves under the foam, the needle will deflect and break.
- Choose the stabilizer:
- Caps: Use heavy non-woven backing.
- Hoodies/Knits: Apply two layers of 2.5 oz cutaway stabilizer to resist the pull of dense satin.
- Technical Fabrics: Use fusible backing on slippery nylon to lock the fibers before hooping.
- Prepare the cap: Remove cardboard inserts. Pull the sweatband completely out and secure it with binder clips to keep it clear of the stitch path.
- Seat the frame: Mount the cap frame onto the driver. Ensure it locks with a confident, mechanical click.
- Execute a Trace: Select Trace on the machine interface. Watch the needle bar path to confirm it does not strike the metal frame or clamps.
Step 6: Position and Anchor the Foam Overlay
Start the machine to stitch the placement line. Verify the machine halts automatically at the programmed Color Stop.
- Cut the Material: Cut foam with a 1-inch margin beyond the design perimeter. Use segmented pieces for widely separated elements to prevent the foam from bowing in the center.
- Position the Overlay: Place the foam flat over the contour line. Ensure no edges curl upward.
- Secure the Foam:
- Tape (Recommended): Adhere corners to the stabilizer using double-sided tape. Avoid taping the garment itself.
- Spray (Alternative): Apply a light mist of temporary adhesive. Always spray away from the equipment to protect the rotary hook.
Sensory Check: Press the foam lightly with a fingertip. It should feel like a "clean sheet" with light tack. If the foam slides under gentle pressure, re-secure it. Loose foam will shift during needle penetration and destroy the registration.
Clear the hoop area and press Start to resume stitching at puff speed.
⚠️ Safety First: Hover your finger over the*Emergency Stop button during the first 10 stitches. If the presser foot catches a foam edge, stop immediately to prevent a machine crash.*
Step 7: Execute the Stitch and Monitor Critical Zones
With the foam secured, press Start to begin the high-density satin layer. Maintain operational vigilance; the needle must perforate the foam without crushing the 3D effect.
- Monitor Risk Zones: Watch these three areas closely based on your design geometry:
- Corners (Block Letters): Check 90° intersections. If foam "elbows" protrude, the underlay is insufficient.
- Open Ends: Confirm that digitized caps effectively seal the tips of the letters.
- Narrow Columns (Script): Ensure satin width remains above 1.5mm. Thinner columns will sink into the foam rather than bridging it.
- Perform a Sensory Check: Observe the thread physics. The satin stitches should "bridge" the foam, creating a distinct, rounded dome.
- If stitches look flat or split apart, the foam is resisting penetration. Stop the machine to prevent a full blank failure.
- Troubleshoot Failures:
- ⚠️ Thread Breaks: High friction often melts foam. Clean the needle eye with alcohol, reduce speed to 350 SPM, or switch to a specialized Groz-Beckert needle designed for heavy applications.
- Exposed Foam: Do not increase tension. This is a density error; finish the run, then increase density by 10–15% for the next unit.
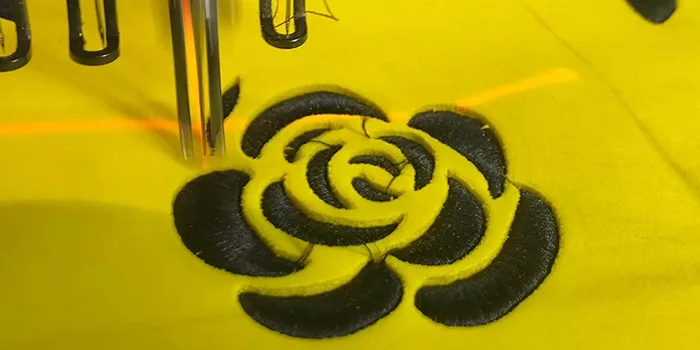
- Validation: The finished column should be solid, and the edges must look perforated—like a postage stamp—ready for clean removal.
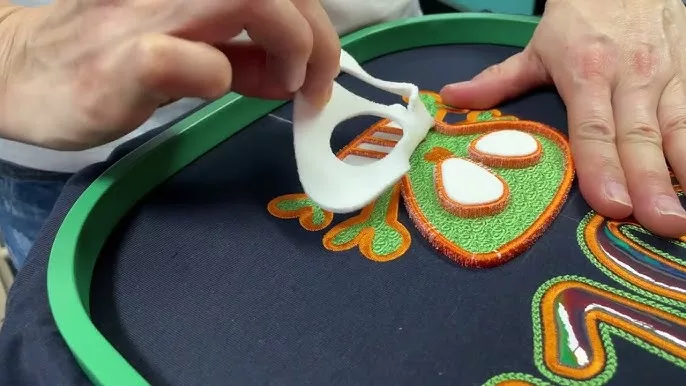
Step 8: Remove Excess Foam and Heat-Seal Edges
Remove waste material immediately after stitching to reveal the 3D effect. You must peel the matrix and thermally seal the edges to eliminate jagged foam remnants.
- Peel the foam matrix. Pull the excess foam sheet horizontally away from the design perimeter. Pulling away from the stitches (rather than upward) ensures the foam shears cleanly along the needle perforations.
- Clear trapped debris. Remove large interior pieces by hand. Use precision tweezers to lift or tuck tiny fragments trapped in counters (like the hole in an ‘A’).
- Note: Do not aggressively yank trapped foam; this loosens thread tension. Push stubborn fragments back under the satin column.
- ⚠️ Warning: Polyester thread melts easily. Test your heat distance on scrap fabric first. Seal the edges. Set a Heat Gun to Low. Hold the nozzle 3–4 inches from the garment and keep it in constant motion. The heat shrinks remaining foam fuzz ("pokies") into the stitches, creating a sealed finish.
Verification Checkpoint: Run a fingertip across the design; it should feel raised, smooth, and snag-free. Visually inspect for edge crispness —a sharp, defined silhouette against the fabric is the primary indicator of a clean finish.
Step 9: Verify Quality, Compliance, and Handover
1. Execute Visual & Tactile QC Inspect the embroidery under angled light (45°). A pass yields a uniform shadow; uneven shadows signal internal foam collapse.
- Edge Crispness: Ensure no foam is visible at corners or end caps.
- Registration: Verify the outline and puff layer align perfectly.
- Abrasion Test: Rub the satin columns vigorously with your thumb. Good QC means zero shedding; if foam bits flake off, edge coverage is insufficient.
2. Finalize Commercial Protocol
- Pricing: Puff runs slower and requires manual trimming. Track total production time to protect margins.
- Compliance: For bulk from Custom promotional clothing imports, request SDS/MSDS foam documentation from your supplier.
- IP Rights: Clarify in writing who owns the digitized source file and edit rights.
- Care: Advise clients to wash inside-out and air dry. Ensure the base garment is heavy enough to support the puff using our guide on.
Troubleshooting 3D Puff Failures
Even perfectly digitized designs fail if machine execution is off. Use this diagnostic checklist to resolve common 3D embroidery failures without scrapping the garment.
Problem: Foam Showing Through Stitches (Most Common)
- Likely Cause: Density too low; columns too narrow (<1.5mm); high contrast between foam and thread.
- Fix: Use precision tweezers to tuck protruding foam under the satin column. Apply brief heat to shrink it.
- Prevention: Increase stitch density by 10–15% (tighten spacing to 0.18mm). Ensure column width settings are wide enough to encompass the foam's loft.
🤫 Insider Secret: The Sharpie Hack. If a tiny speck of foam remains, do not over-stitch. Lightly touch the exposed foam with a permanent marker that matches your thread color. It disappears instantly.
Problem: Needle Breaks or Thread Snaps
- Likely Cause: Speed >600 SPM generates friction heat, melting foam onto the needle groove.
- Fix: Replace the needle (it is likely bent). Clean the hook area. Limit speed to 400 SPM.
- Prevention: Use Titanium-coated needles to reduce heat buildup.
Problem: Puff Looks "Flat"
- Likely Cause: Heavy structural underlay (like Tatami) crushes the foam before the satin stitch covers it.
- Fix: Disable standard underlay. Use only "Edge Run" to secure borders without flattening the center.
Problem: Ragged Edges / Poor Tear-Away
- Likely Cause: Using low-density "craft store" foam.
- Fix: Switch to high-density embroidery foam (35–40 Shore Hardness). Ensure digitizing includes "capping stitches" to perforate column ends.
Problem: Misalignment
- Likely Cause: Foam shifting during jump stitches.
- Fix: Secure foam corners with double-sided tape applied directly to the stabilizer (outside the stitch zone).
Problem: Heat Gun Scorched Fabric
- Likely Cause: Holding the heat source stationary.
- Fix: Stop. Melted polyester cannot be fixed.
- Prevention: Keep the heat gun in constant motion, 3–5 inches from the fabric.
The Re-Test Protocol
Stop wasting blanks on random guesses. Change one variable (e.g., speed), run a test on scrap fabric, and log the result. If it fails, reset that variable and adjust the next (e.g., density).
Conclusion: Scaling Your 3D Embroidery Output
Mastering puff embroidery is not just about the stitch—it is about process discipline. Your "Golden Sample" is achieved only when the edges are crisp, the dome is smooth, and there is zero foam peek-through. Once you achieve this, document everything. Save your machine speed (SPM), stabilizer stack, and density settings as a preset for future runs.
However, while in-house execution is perfect for prototyping, high-volume production requires a different strategy. When your order volume exceeds your machine's capacity, or you need to standardize blanks across thousands of units, it is time to outsource.
Contact** LeelinePromotion** to manage your bulk production. We act as your supply chain engine, ensuring that every unit to complex kitted accessories—matches the quality of your golden sample.
Whether you are producing limited runs of or scaling for a global event, disciplined testing today pays off with premium, retail-ready products tomorrow.
Frequently Asked Questions for Puff Embroidery Guide
Q1. What is the minimum column width for puff embroidery?
The absolute minimum column width is 3mm, though 4mm to 10mm is the ideal range for stability. Any column narrower than 3mm will not successfully perforate the foam, leading to messy edges. Conversely, columns wider than 10mm–12mm generally require a split satin stitch (to prevent snagging), which interrupts the clean, smooth dome effect required for 3D puff.
Q2. Why does my foam poke through the stitches?
Foam exposure, or "peek-through," is almost always caused by insufficient stitch density or a lack of end caps. Standard embroidery density (0.40mm) is too loose for 3D applications. You must manually increase density to 0.18mm–0.20mm to create a solid wall of thread. Additionally, ensure the ends of letters are "capped" with perpendicular stitches to seal the foam inside.
Q3. Is puff embroidery durable for workwear?
Yes, but with caveats regarding care. High-quality, high-density foam (35–40 shore) is resilient and can last for years if washed correctly. However, 3D puff is more susceptible to abrasion than flat embroidery. We recommend it for hats and outerwear rather than high-contact areas on uniforms. Always advise washing items inside-out and air drying to prevent heat from deforming the foam.
Q4. Can I use puff foam on lightweight t-shirts?
No. Puff embroidery requires high thread tension and dense stitching that creates significant "pull." Lightweight fabrics (under 6oz), such as standard jersey t-shirts, cannot support this structural stress and will pucker or tear around the design. 3D effects are best reserved for stable, heavyweight substrates like 6-panel caps, canvas bags, or heavyweight.